All the huds, all the time

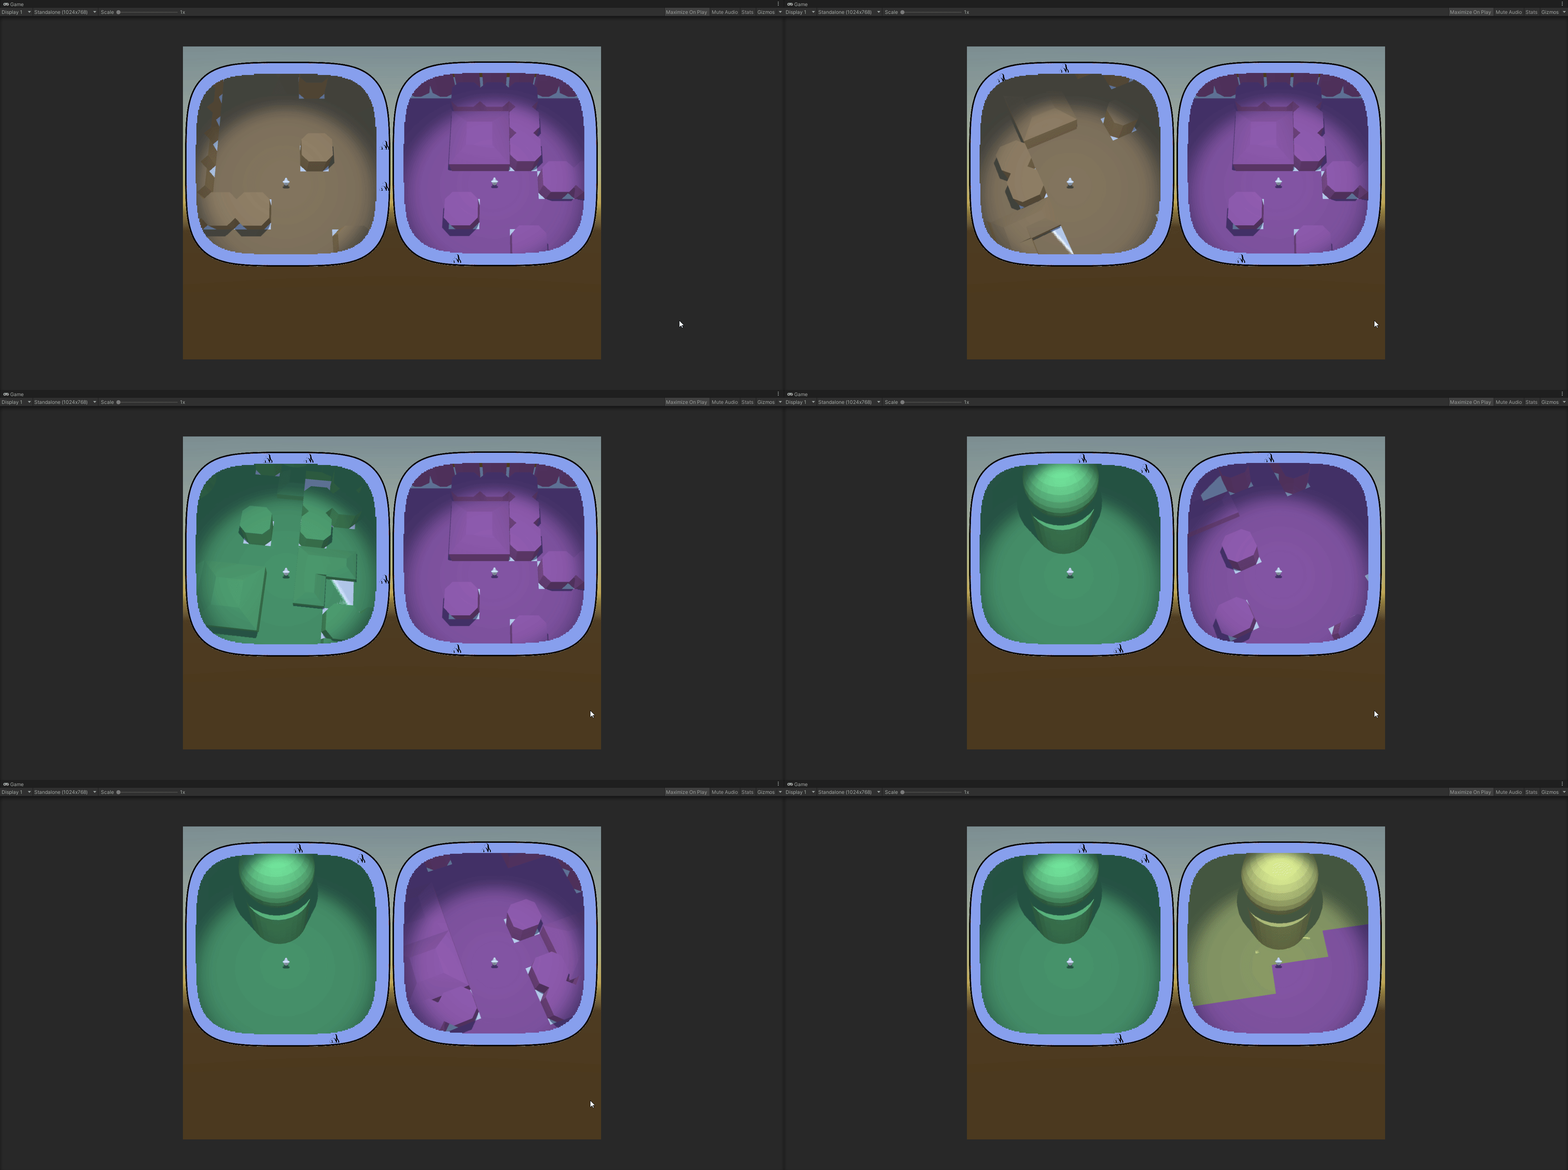
Finally, the huds are (basically) ready.

At least they sork properly with static icons – ones that are generated with the map and are never destroyed.

Each hud correctly displays only the icons that are in the vision range of the respective player and drops the icon when the object in question is visible on the minimap.

I think that will be all for the year.

Next – player inventory and item use, I think. We’ll see…

Chaining them hooks

(Successor to https://mossgoblin.com/2020/02/18/egg-and-chicken-in-unity/)

I got this problem again, when different component scripts compete for precedence. Always something to think about when you have multiple entities (not the technical term from dots).

In this case I was integrating the successfully prototyped hud/radar system into the main scene and I got the following situation:

The MapController (the main conductor in the scene) gets a list of points of interest (POI) to be displayed on the huds. It send them to the HudController.

It also positions the players and sends their transforms to the HudController again.

The HudController decides which of the POI are visible for each player and creates two separate POI lists and sends them to the player huds, along with the respective player transforms.

Then each hud takes care of initializing the compass of the player and displays the POI list it has.

Who Starts() first. Madness and definitely not the proper way.

We leave aside the fact that the two controllers and both the huds are component scripts and not simple C# objects. Quite the anguish, deciding it should be so. I would not have the chaining problem if I used pure C# classes for those, but building and setting up the scene turned out to be much much easier with properly exposed component scripts.

So… one Start() to rule them all! Here’s how it ended up looking:

MapController

+Start()

  • PrepPlayers()
    • Send players to HudController
  • PrepGeneralPOIList()
    • Send generalPOIList to HudController
  • HudController.Run()

HudController

+Run()

  • Send players to each player Hud
  • Split generalPOIList into two playerPOILists
  • Send one playerPOIList to each Hud
  • for each Hud: Hud.Run()

Hud

+Run()

  • Display playerPOIList

I feel weird having component scripts that have logic, but don’t have Start() hook, but.. it seems to work. I am pretty sure that’s not optimal and there are better ways to organize the action flow. But it will have to wait for some other project.

Squircle Resolved

At the end I had to give up on calculating my squircle by hand.

Two reasons

  1. Unity gives an automatic way to approach the problem;
  2. The tool Unity gives works with any (some kinds of any) type of shape, not only with geometrically correct squircles

I ended up using ray casting. I feel like I cheated, but.. that’s life. On one hand, I don’t have the nerve to develop the maths to deal with the problem myself, so… see reason 1. On the other hand, I have the consolation of working with shapes even better than a squircle.

Here’s how it goes:

You have a player somewhere on the map and a list of objects you want to track on your compass.

On the minimap you see the player himself. He always keeps his Noth-bound position, so when you rotate, you see the map rotating around you. Each trackable object (if not close to be seen on the minimap itself) is represented as an icon on the border of the minimap. The border is the ‘compass’.

You get the angle between the player forward position and the object in real world, then create an icon on the compass and place it on the compass, keeping the same angle between the up position of the canvas and the icon. The problem is the distance between the icon and the center of the minimap.

Here’s what you do – you have a secret object, outside of the playing area, that is basically a 3d version of the shape of your compass. That’s your ‘wall’. It’s hollow. In the middle there’s a radar object with a small script. You give that script the angle ‘in the real world’ between the player.forward and the object. The radar fires a ray at that angle and returns the distance to the wall at that angle.

You get that distance, scale it accordingly and give it to the compass.

If feels clunky to have a real world object that scans constantly to get the distance, but it undoubtedly works and it works with almost any shape, at that. The only limitation for the form of your compass and minimap is that the border can not swerve to an extend that one part of it blocks line of view from the center to another part.

Here’s the physical object with the (invisible) radar in the middle.

The radar is currently tracking 6 objects from the map, using angles, provided by the map itself. The visible rays are Debug.DrawRay().

Here are the map and the radar complex, set aside it:

You can clearly see that I haven’t even bothered to set the anchor points of the objects to the centers of their bases. I am tracking their basic 0,0 vertices here. Irrelevant.

Here are both the scene view and the play view:

All colored objects are on the compass. The compass itself is the blue band around the minimap.

This was just a feature-dev scene, so I didn’t bother matching colors of objects to icons. Black icons are blue objects. Yellow is yellow.

So… this has not yet been transferred to the main scene. In the full version you have multiple type of objects that you can see on the compass, some only from a certain distance. All of them should disappear from the compass if there are actually seen in the minimap (here you can see the yellow object bot on the map and the compass).

This step of transferring the compass success to a ‘main scene’ type of actual structure will be hell…


Uuhh!! Look what I found ShareX can do!

Screen recording! And – Tadaaaa!  – Screen recording to GIF!

Biomes!

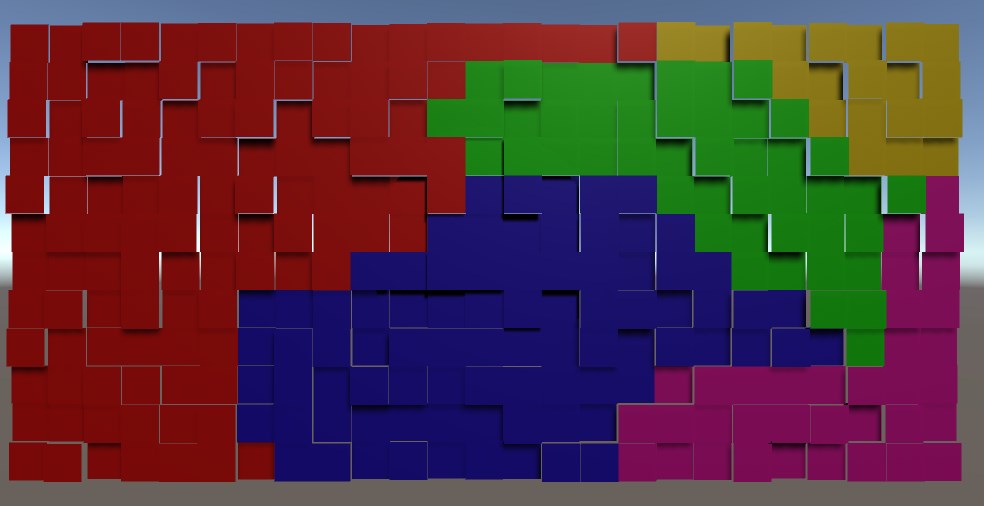
Aaand we have biomes!

In this case they have only a visual role. The objects that the environment is constructed of have types and those are what is functionally important. I need the biomes, however, to mark different sections of the map differently. The players needs to be able to look at their minimap and determine that they are not in the same type of terrain.

The approach I took was to select points on the map that are generally far away from each other, then flood the area around each one. Of course, steady flood would mean straight lines between the biomes, so I had to think of a randomness.

SomeBiomes

I used random ‘height’. There is no height in the game, but the concept for randomization is height and I needed a visual distinction between the tiles while devving, so…

The idea is that in each iteration of the flood a tile is evaluated.

Each non-marked neighbour is marked for checking (pretty standard).

The check of the tile itself is a comparison of the height of the tile against a pre-set threshold. If the tile is low enough – it is marked with the color of the biome. If not – it is lowered by an amount and added back to the collection of ‘to be checked’ tiles.

And if you do it for each biome in turn, each with its own flood – it works!

We’ll see how it will break when I add it to the main scene 🙂

Enter Squircle

So… Remember how the players use glorified minimaps to actually play?

One of the main features of the minimap is the compass – icons, showing direction to points of interest.

Easy enough to do it on a circular compass. Found a way to do it also on a square one. The main concern is that the circle does not cover space well and I would be happier if I can allow the players top see more of their surroundings. Here comes the square minimap. However, square is not… friendly. I kind of don’t like the sharp corners. This can be, of course, mitigated, by designing the whole UI to accept such corners, but why mitigate a problem when you can resolve it?

Enter squircle – a square with rounded corners. It would look well and give more visibility than a circle with same radius as it’s side length. But how do you project icons on the compass?

The way the compass works is simple – you get the angle between the player forward direction and the direction to the object, translate that angle on the minimap and place the icon the right amount away from the center of the minimap. Yeah, that’s the problem. For the circle it’s basically a non-problem. For a square – I found a solution online (see below).

But a squircle? I think I found the correct road to a solution, but it’s still a rocky road for a person how has not practice any meaningful math for decades.

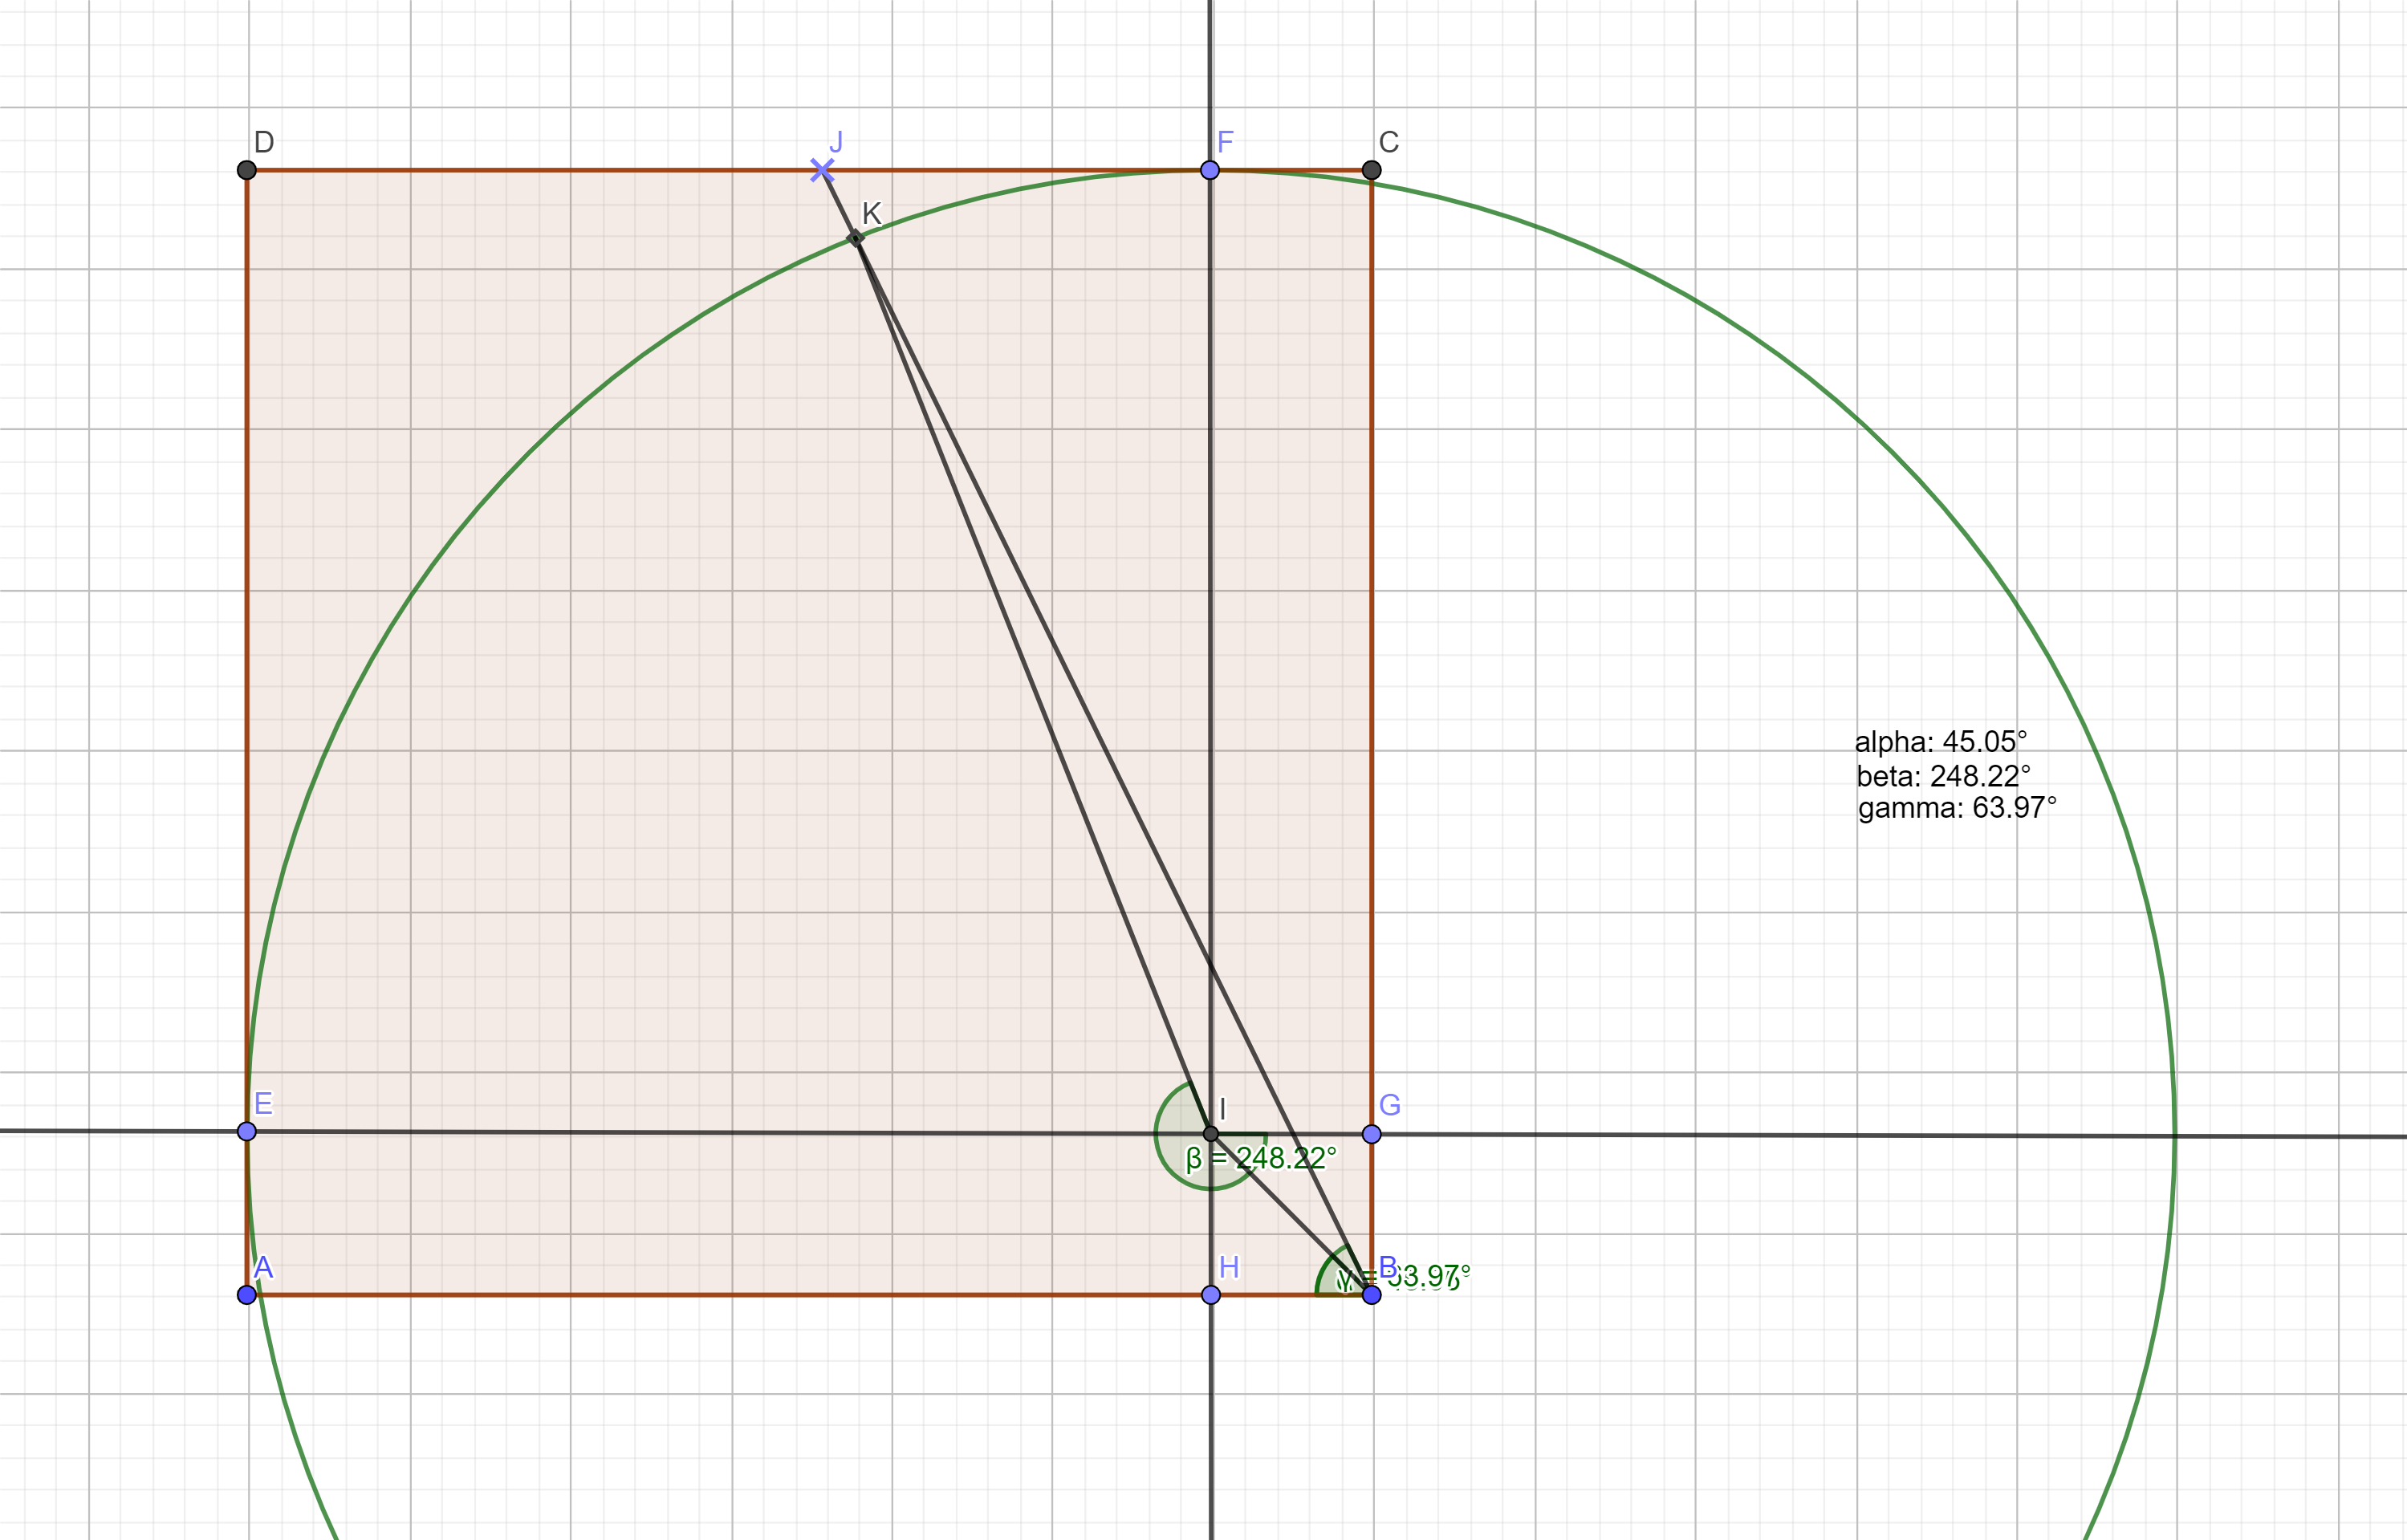
Here’s the construction:

a section of the squircle

The shape goes between two extremes. You have two governing variables – the radius of the corner circles and the length of the straight intervals between the corner circles. So the whole shape has two extremes:

  • it’s a circle if the intervals have length of 0
  • it’s a square if the radiuses are 0

What is given:

  • the radius of the circle
  • the length of the interval
  • the angle between (any) axis (IE) and the line passing through the center of the compass and the target icon (BJ)

What I need to find:

  • The angle between (any) axis (IE) and the line that connects the center of the circle and the crossection of the circle and the line from the center of the compass and the icon (IK)

Compass

Created the proof of concept for the compass. Not a real compass, though, I mean markers along the rim of the minimap that show you the direction to different points of interest.

Finally got it to work (#working _with_angles), but an interesting bug appeared – in the test room the player is spawned directly adjacent to the object that the compass is tracking. And if you rotate, the compass displays the direction properly. However if you take as stroll (of whatever magnitude), the method for calculating the angle suddenly looses the abolity to work in the proximity of 0 ° and 180 ° – the statement that calculates the direction to the object starts behaving strangely – the angle, for some reason, avoids -20 ° to 20 ° (thereabout). The general behavior is that when the angle reaches certain low threshold (looks like 20 °, but I have to do some more testing) it jumps to the negative of the same, completely ignoring the values in between. Same in the other direction. Same for 180 degrees opposite. Whuh??

P.S. Yeah, a lead – the angle is calculated based on a simple direction spell (target_position – my_position). Apparently this fails when the angle is too small. Grid resolution?

Minimaps

The last approach worked. Which is good, cause I started to get exhausted from changing approaches. (There’s gotta be some sort of coding stamina stat – how many times can you rewrite your code in pursuit of an optimal solution before you get sick of it).

Basically, as I wrote previously, the best way to find two random points that can be connected (at least in my case) is to flood-fill the plane, which gives me all the points that are connected and also connected to the starting point, then select from those points a second point.

So yeah, that part works.

Then I combined that with the minimaps* and put the minimaps on a canvas and… I have to create some sort of compass. Not the regular north pointing type, but a quest compass – one that is simply the border of the minimap and hosts icons for points of interest. The points, as you can guess, need to run around in accordance with the orientation of the player so that he always knows in which directions the dragons be.

Funny thing is – I spent two hours trying to remember how to import a .png file and create a sprite out of it, so that I can even begin working with it in the UI 🙂

  • Yeah, I know, I haven;t disclosed yet what the actual game is about. Got to do it one of this days…

Gridlike

I really like using layered grids to create maps. This may not be the optimal way to approach the problem, but I find it delightfully systematic.

Basically what I always end up doing is creating a number of same sized grids, each with it’s role towards the goal of creating a map – the basic grid (only empty and filled spaces, whatever function they might have), grid with special objects of type “A”, type “B”, grid with height deviations, calculated from some game balance constants, a grid that splits the map into areas, important for something else, a grid that holds probability for different spawns and so on and so forth.

So far – pretty standard. What I am not sure is whether I really need to keep them up at all times. What I do with the grids is combine different sets of them whenever I need to, but may be that’s just showing off – “See, we have enough memory now to afford being inefficient”. Who knows. For a small project it’s certainly not a problem. But I keep thinking I should spend some time exploring optimization for optimization sake, just to ensure I have the mental tool when I need it.

Otherwise – it works fine. I have the map now (kind of) and it’s ready to be tested.

How did I get here? I’m glad you asked…

I have a map that (stripped from any additional functionality) is basically a grid in which random cells are unwalkable. And I have to select two of the walkable cells to use for starting points. Additionally, I had to make sure there’s a way to trace a path between the two starting points.

Well… The naive approach was not expected to work and it did not – I tried selecting a random point and checking whether it’s available. If not – select a new random one. “Taking too long” to find a good point happened even more often than expected, so… What else.

I figured I have no interest in the non-walkable points, so why not put all available points in a list (only Vector3 representations, cause I only need the coordinates), then select from that list. The first point is kind of OK. I need it to end up roughly in one part of the map, so… given that the values in the list are meaningful coordinates, that was not hard. But then I wanted to select the second point such that it is not too close to the first. And I spent a couple of hours brain fried after work trying to construct the perfect .FirstOrDefault() to do the job. I ended up not entirely sure I’m not chasing the wrong idea.

Back to selecting the points directly from the grid, then checking for path between them.

Improvement – the “Blast radius” method. Select a point and check if it’s available. If not – check for available points within radius one. That’s orthogonal adjacency, cause no one needs trigonometry for this particular task. For radius one – check in order the cells on the left, above, right and below the first one. If those are not available – check for radius 2 – a rhomboid perimeter around the first cell. And so on. This worked, eventually. Find two separate points, each as close as possible to a point, that is randomly selected to match some vague constraint (as in “close to the center of the right half of the map”). Then you run an A* pathfinding algorithm to ensure the two points can be connected.

***

Intermission – I have problem using x and y for grids – the problem is that x and y don’t mean anything, which makes them easy to mix. And they do not allow you to take advantage of the fact that those are representing values that have real meaning – dimensions of a grid. So I always use width and depth (which can be height, depending on your setup). So… width and depth is it. It turns out when you have so many grids and so many separate operations on them, it is very hard to find where exactly you have switched the places of the two variables – either as indexes or as counters in some for loop or as boundaries in a for loop.

A week of “index out of range” errors and I have now officially adopted a new name – Off-By-1 Kenobi!

***

And of course right after I made it all work, I came up with a better idea. What is the current problem? You find two points, blast-radiusing, if needed, then run the path finder and you may find that there is no available path, so… right, you don’t have to select two new points. From the list of cells, checked by the pathfinder, select the one that is closest to the point you could not connect to. So there!

But!

Why then go through all the trouble of not knowing if there will be a path? What if you could combine the pathfinding and the random points and avoid the possibility of needing a blast-radius after all?

Yeah. What I’m about to try now is simply flood-fill the map, starting from any available point. At this point I have to check if I have indeed flooded the map, and not one small isolated puddle. The density of the map makes it very unlikely to generate an available spot with 4 unavailable neighbors, but still, not impossible. So I flood, I check, then I choose two points, using my initial vague requirements (as seen above: “close to the center of the right half fof the map”).

Something like that.

The Factory

Not much, but I’m quite proud it works well.

In the begining I implemented a simple Factory that had to know what exactly it’s doing (a.k.a. methods like “CreateThisObjectPrecisely()”).

After some tweaking I finally managed to implement the proper library – a bit generic and reliant on an “IProduct” interface. The downside is that (at least for the moment) it uses only enpty constructors for the data classes, but that may change later.

A very persistent idea of mine is to fonally create a truly generic factory that dows not care at all what it’s producing, but the real deal will delve completely into reflection and I am not ready for that yet.

All in all – I am quite happy with the result so far.

Oh, one other thing – it’s a static factory that works with a singleton PoolManager, so garbage collection is taken care of, as much as possible. So far I Pooling is may be the most important game design pattern I have come across.